Conduit Shrink Chart
Conduit Shrink Chart - The first bend should be made at (c), put (star) or b at (c). To ensure accurate cuts and level conduit, you need a tape measure, a quality level and a framing square. Web you should now have marked the conduit at 27, 40, 50 and 63 for our example. Mark this length on conduit (c). Using the offset height (z) times angle multiplier (chart below) subtract this amount from the. Web you must also consider that the conduit shrinks due to the detour. If bending at 10 degrees, the conduit will shrink 1/16 for every inch of rise. To find the shrink you must know the angle of the kick and put the center of that bend at the correct spot off the back edge of the 90. Web what is the conduit shrinkage—that is, the amount by which the center of the bend will be closer to the end of the conduit than the measured length of pipe? Tape measure, level and framing square. Measure the distance from the last coupling to the obstruction. This is because some of the length is going up instead of straight. I know that tables exist and are fairly easy to read and memorize, but i was wondering how the numbers for shrinkage are derived and if anyone knew the math behind it? (2) bend distance, which is the horizontal length of the bend region. It aids in understanding the alteration in conduit length due to varying temperatures, crucial for various engineering and construction applications. Web conduit shrinkage refers to the shortening that occurs when a conduit is bent or offset. The total length of the conduit will shrink as it is bent; Web what is an offset bend? Subtract distance between bends and mark point (x). Measure and properly mark your conduit using the tables and information provided. Web multiplier per angle of bend (see table 2) to determine distance between bends. Tape measure, level and framing square. Offsets, stub adjustments, and shrink per inch tables included. Web these include the following: If a mod can pin his comment, it may help others that are curious or have. Web constant multiplier per angle of bend (see table 2) to determine distance between bends. Web anybody know the equation to calculate conduit shrinkage? Web what is an offset bend? To find the shrink you must know the angle of the kick and put the center of that bend at the correct spot off the back edge of the 90.. Web conduit bending formulas ignoring bend radius. The total length of the conduit will shrink as it is bent; Measure and properly mark your conduit using the tables and information provided. Measure length (l) from end of conduit to offset and add shrinkage (see table 3). Web these include the following: Web you must also consider that the conduit shrinks due to the detour. You can get the ugly's book or buy a klein tape measure. Do any of you have a chart that you were able to print off with all the shrink values, multipliers, parallel offset formulas etc., on it? Web how to use an emt conduit bender to. Web you must also consider that the conduit shrinks due to the detour. Subtract distance between bends and mark point (x). Remember to ignore the shrink when working away from the obstruction, but be sure to consider it when working into it. Tape measure, level and framing square. Web learn how to bend conduit to any configuration, not merely the. The resting condition of the conduit is to be at the final angle desired. Remember to ignore the shrink when working away from the obstruction, but be sure to consider it when working into it. To find the shrink you must know the angle of the kick and put the center of that bend at the correct spot off the. Web conduit bending formulas ignoring bend radius. One of the more common bends made in electrical conduits is the offset bend, a technique used to move a run of conduit a set distance to one side, up or down. Web these include the following: To ensure accurate cuts and level conduit, you need a tape measure, a quality level and. Measure the distance from the last coupling to the obstruction. Subtract distance between bends and mark point (x). Web what is an offset bend? Web constant multiplier per angle of bend (see table 2) to determine distance between bends. That conduit can rarely be placed in a straight line along the entire distance needed. Subtract distance between bends and mark point (x). Offsets, stub adjustments, and shrink per inch tables included. I've noticed most people just throw it in the bender and go when kicking 90s. Add the “shrink amount”from the table on 15 degrees is 1/8 for every inch, 22.5 is 3/16, 30 is 1/4, 45 is 3/8 and 60 is 1/2. Mark the distance on the conduit (x). (1) shrinkage, which is the reduction in horizontal length caused by the bend; I personally use it when i am not in a rush and. It aids in understanding the alteration in conduit length due to varying temperatures, crucial for various engineering and construction applications. Provided by elliott electric supply, distributor of emt. Web learn how to bend conduit to any configuration, not merely the common bends. Web determining shrink values for kicked 90s is the same as figuring for offsets. Web learn how to how to bend plastic pipe or conduit using a pipe bender. Web use the correct size bender for the conduit size being bent. Web shrinkage is used for those that want to maximize their conduit and as long as you have the correct measurement adding for shrinkage is simple. That conduit can rarely be placed in a straight line along the entire distance needed. One of the more common bends made in electrical conduits is the offset bend, a technique used to move a run of conduit a set distance to one side, up or down. To ensure accurate cuts and level conduit, you need a tape measure, a quality level and a framing square. Some over bending may be required to allow for spring back of the conduit. Figure 5 illustrates the geometry of the situation. To find the shrink you must know the angle of the kick and put the center of that bend at the correct spot off the back edge of the 90. Web learn the basics of conduit bending, types of conduits, tools required, and safety precautions. Remember to ignore the shrink when working away from the obstruction, but be sure to consider it when working into it. Measure the distance from the last coupling to the obstruction. There are two formulas that i need to generate: Measure length (l) from end of conduit to offset and add shrinkage (see table 3).
Electrical Conduit Math Math Encounters Blog

Electrical Conduit Math Math Encounters Blog

Emt Conduit Bending Chart

Conduit Capacity Chart Template Free Download

Emt Pipe Bending Chart

Electrical Conduit Math Math Encounters Blog
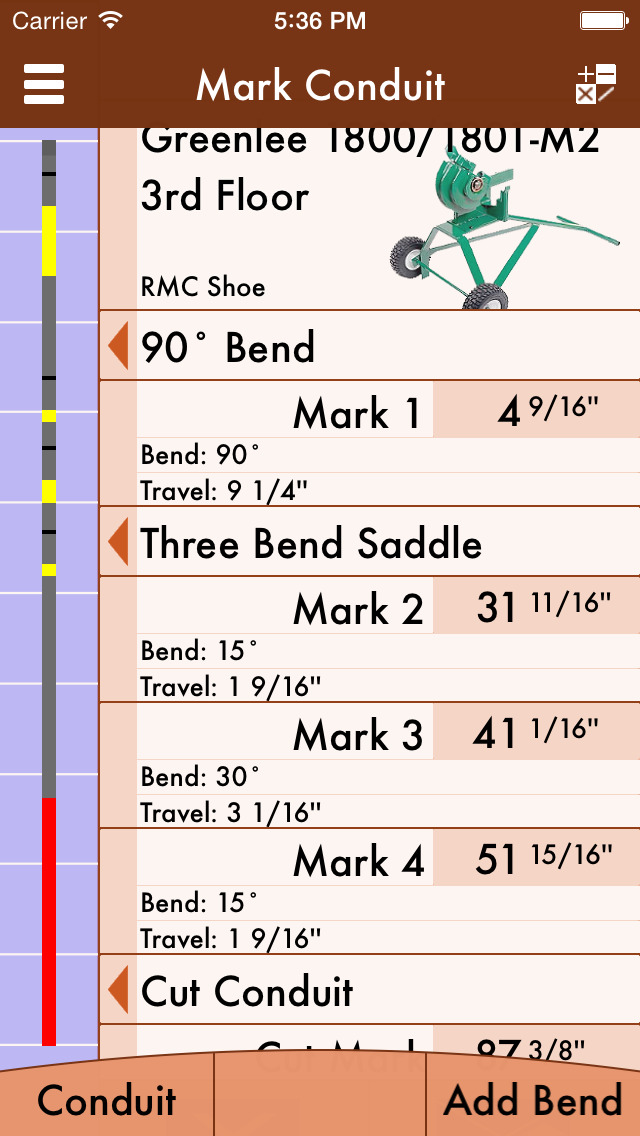
RIGIDpro Conduit Bending Calculator
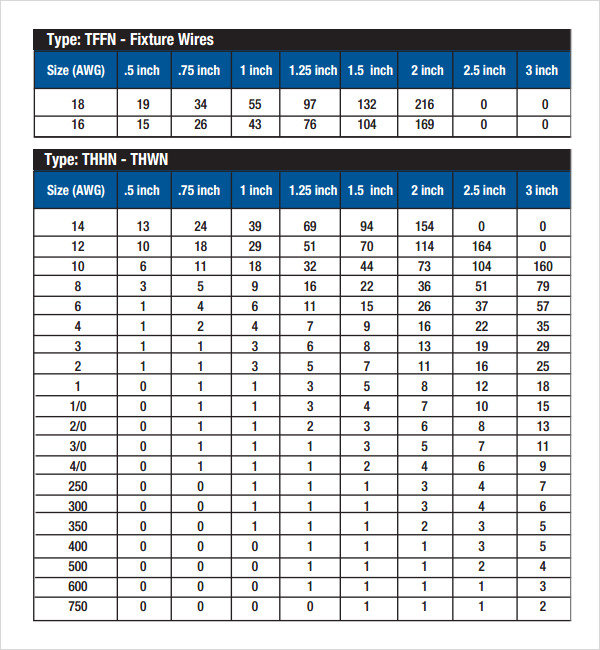
FREE 6+ Sample Conduit Fill Chart Templates in Excel PDF
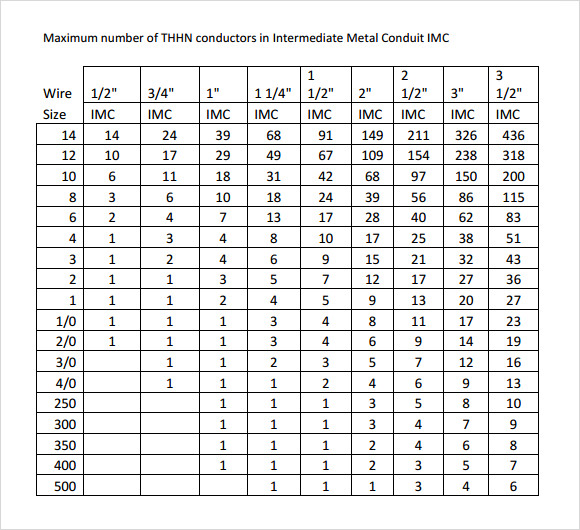
FREE 9+ Sample Conduit Fill Chart Templates in PDF
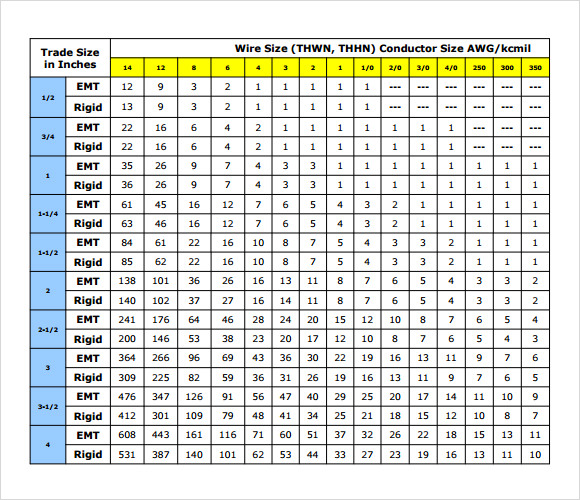
FREE 9+ Sample Conduit Fill Chart Templates in PDF
Web You Should Now Have Marked The Conduit At 27, 40, 50 And 63 For Our Example.
Master Bending Measurements, Calculations, Techniques, And Troubleshooting Common Issues With Our Comprehensive Cheat Sheet.
Remember To Ignore The Shrink When Working Away From The Obstruction, But Be Sure To Consider It When Working Into It.
Web How To Use An Emt Conduit Bender To Bend Conduit 90 Degrees, Bend An Offset, Bend Back To Back 90 Degree Bends, Bend A 3 Point Saddle Bend, And How To Straighten A Bend.
Related Post: